Account Manager CRM Toolkit Help Guide

Tutorials

Tutorial 1 - How To Create A Direct Mailing Piece

Download Video: Closed Format: "MP4"

Tutorial 2 - Additional Resources

Download Video: Closed Format: "MP4"

Tutorial 3 - "Your Business Matters" Customer Emails

Download Video: Closed Format: "MP4"


Introduction

This document has been created to provide a help guide to using the Account Manager CRM Toolkit. It explains the functionality of the different parts of the system. The software enables you to select mailing pieces to send to your customers, as well as housing other resources e.g. Insights and Trends, Case studies, Email templates and This Month’s Activity ‘Your Business Matters’ Email Assets.

‘Signing into Your Account’

1. Email.. In order to access the site, you will need to input your Royal Mail Email address into the ‘Email’ box

2. Password Please enter your Royal Mail email address details to into this box. The password has been provided to you by Royal Mail (or initial) but this could have been disabled by the user, and changed to a new password.


Home Page

This is the home page which provides you with an introduction to ‘Your Customer Relationship Manager Toolkit’. This provides links to ‘This Month’s Activity’ and an email link to provide your feedback on the toolkit. We welcome feedback so that the toolkit can be tailored to the Account Manager’s needs so simply click on the link at tell us your thoughts on future development, ideas on assets etc.

Toolkit Functions

Along the top of the screen contain various button including ‘My Account’ containing the individual’s account information; Mailing awaiting approval which is ready for check out; drafts where mailing pieces are still under construction; help guides where help guide is available and sign out to close the toolkit.

Products and Resources

The first six folders are product folders, which contain mailing templates and are categorised by Royal Mail products. Upon opening these folders there will be different mailing pieces to choose from. Where we do not have content under a particular product e.g. Marketing Mail the folder will contain a ‘Coming Soon’ placeholder, this will be replaced with a mailing piece when it becomes available.

The final two folders are the Help and Resources folders. The Help folder holds the help guides, the resources folder contains a set of sub folders which contain assets e.g. Case studies, This Month’s Activity, Archived Activity, Email Templates and Trends and Insights. Full detail is provided later in this document.


Step by Step Guide to Creating a Mailing Piece

Select Mailing Piece

1. Select your Product from the list on the left hand menu – In this example I have selected Parcels. This then show the mailing communications you can send. There is a short description under each mailing template, but you can also press on the ‘Enlarge’ image which will open the mailing piece so that you can read the content.

2. Once you are happy with the mailing piece you click on ‘Place an Order’ to select the mailing piece you wish to use.

Product Detail

1. This confirms the mailing piece you have selected. If you wish to read the mailing piece again, click on the image and it will open up to allow you to vied.

2. Once you are happy click ‘Continue’

Recipients - Selecting the Customers to receive the mailing piece

This is where you select the customer record/s you wish to send the mailing piece to. Things to note:

1. Customer Data - Please note the list is of only your customers who have been ‘Nominated’ and are flagged as having permission to send mailings to. If a customer record is not present, it will be because of this reason or they were not within the main database when the data was selected. The data will be updated on a weekly basis. If the you wish to ‘nominate’ a new customer, this must be done on Siebel by 3pm on a Thursday to appear on the Toolkit the following Wednesday.

2. Searching - You can select your recipient from the list provided; you can search by company, surname, urn or postcode.

3. You can search in various ways: a. Order the columns so they are ordered in alphabetical order. b. Search using key word e.g. Smith – it will search all fields, so will provide Mr/Mrs ‘Smith’ or by part of a name e.g. ‘Doug’ and it will return for example ‘Mr Doughty’. Searches will show all records with those letters in the name, address etc fields. c. The searches are not case sensitive.

4. Selecting Customers - You can one or multiple recipients if required. To select recipients simply click the check box against their name on the left hand side. If you are sending to more than one customer, continue searching and checking the box of the next customer and so on until you have created a list you are happy with. If you decide not to include a record you have selected, just ‘untick’ the box next to their name.

5. Once you are happy you have selected all your customers click ‘Next’

Proofing your Mailing

1. This is where you check/proof your mailing piece. It allows you to check you are happy with the personalisation which is brought through onto the mailing piece. By clicking on the ‘View proof’ button a PDF opens, showing the personalisation on the mailing piece.

2. If for any reason you amend anything e.g. remove a record, click ‘Back’ which will take you back to the ‘Recipients’ page.

3. Once you are happy with the proofs, you must to tick the ‘Proof is approved’ box otherwise the software will prompt you to do so, prior to moving to the next stage.

4. Click on ‘Add to Cart’ to move onto the next stage.

IMPORTANT TO NOTE

The software allows you to start creating a mailing and you can stop that process at any point and come back to it. If this does happen, this is where you will find your work.

Drafts – This is where you will find your mailing piece if you got up to any stage prior to Approving Proofs. Please not the system automatically saves up to three of the latest drafts. You need to maintain this folder, and save your automatically saved drafts into the save box or you will loose any historical drafts when you exceed the three draft limit. Full instruction in the ‘Draft’ section of this document further down.

Mailing Awaiting Approval – This is where you will find your mailing piece if you have ‘Approved the Proof’ but have not finished the steps to completing the order.

Mailing Awaiting Approval

1. ‘Mailing Awaiting Approval’ displays all orders waiting your final approval including the mailing piece and amount of recipients. If you are happy to proceed to check out with ‘All’ of your orders ‘Check out’ button. However:

• If you wish to delete any of your orders you can do so by clicking on the ‘Dustbin’.

• If there are orders that you DO NOT wish to include as part of your existing orders, click on the ‘Trolley’ on the left of the order. This will remove the current item from your existing order, but keep it within the ‘Mailings Awaiting Approval’ part of the Toolkit to be referenced in the future.

• If you wish to continue to create another mailing piece, click on the ‘Continue Shopping’ to create it and it will be added to your order.

User detail’s against the order

This page just summaries the user who has made the order. The order details behind the scenes have to be held against the customer records that is being mailed for reporting and campaign history purposes. PLEASE NOTE although it says Payment against the Address details , the Account Manager will not pay for anything. You will see in the following screen a bill and it will show £0.00 – this is just part of the software.

Press ‘Next’ to continue (or ‘Back’ if you wish to go back)

Check Out – Content of the order

This page allows the Account Manager to see a summary of their order. Obviously the Account Manager could have ordered more than one mailing piece, and if so this would be referenced here.

PLEASE NOTE – As previously noted, there is no cost as shown in the red box £0.00 GBP

THIS PAGE WILL PLACE THE ORDER OF YOUR MAILING PIECE/S WHICH WILL BE SUBMITTED TO THE PRINTERS WHO WILL DESPATCH YOUR MAILING PIECE

Therefore you must only Press ‘Checkout’ if you are sure you wish to place the order. If you do not wish to place the order, click on ‘Back’.

Order Confirmation

This is the final page in the ‘Creating a Mailing’ process.

1. Order Summary – This screen confirms that your order has been placed and will be produced. The screen shows your order reference number which you can print if you press ‘Print Order Details’. Alternatively you can press ‘Continue Shopping’ if you wish.

2. An ‘Order Confirmation’ email will be despatched to the Account Manager’s Royal Mail email address confirming this order and reference number.

3. Delivery of the Mailing Piece to Customers: Orders place by 12pm will be delivered to your customer the next working day. Any orders placed after this time will be despatched the following working day, to arrive with the customer two working day after the order was placed.


Resources

Under the Resources section, you will set a set of Sub folders. If you click on these sub folder, you will see their content. If there is a ‘Coming Soon’ placeholder, that is because there are no assets at present e.g. within the Proposal subfolder.

This Month's Activity

This folder holds all the information required to be fully up to speed on the ‘Your Business Matter’ monthly email send. It will contain the email creative so that you can see what is being sent out. It will contain FAQ documentation, giving you a background to articles and ready for any questions that may arise. There will a spreadsheet per site which will contain the customer data. Each spreadsheet has a tab of each Account Manager which will contain the customers who the email is going to be sent to. Please note there could be times where the email may not be delivered to the customer e.g. the email address is incorrect, a customer has left the organisation but this will be monitored by the Marketing Team.

Archived Activity

This folder has a ‘Coming Soon’ placeholder as we are yet to have Activity that can be archived. This will be populated as soon as we do, and the guide updated.

Research and Industry Trends

This folder contains Research and Industry Trends which can be downloaded as pdf. These cannot be sent out to customers as physically printed pieces (like the mailing pieces). They are a reference for the Account Manager. They could also be sent to a customer for future discussions.

Case Studies

This page contains various case studies who used different Royal Mail products and come from different company types and sizes. The ‘case studies’ can be downloaded by the Account Manager and shared with their customers.

Outlook Email Templates

There are two ‘Outlook Email Templates’ within the software. You can press the ‘Enlarge’ button to read the copy.

If you press on the ‘Download’ button the email will open a window in ‘Outlook’ allowing you to send the email to your customer once you have happy you have added all of your contact details.

Proposals

The Proposals folder has a ‘Coming Soon’ placeholder at the moment. In the future this will hold proposals which can be shared with customers.

Help Guide

Within this folder contains various help guides, including this one and the ‘Step by Step’ Tutorials, which can be downloaded. This can be done by clicking on the ‘Download’ buttons on the right hand side of the videos.


Toolkit Functions

My Account – Overview

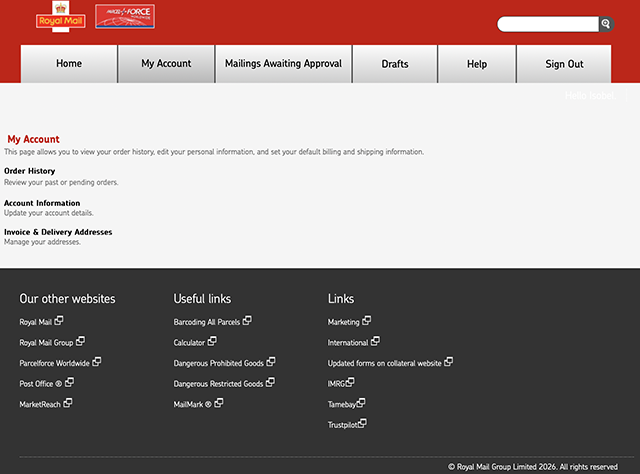
This is a summary page providing you with links to Order History, Account Information and Invoice & Delivery Address.

Oredr History

This is where you review your past and pending orders. To view the order simply click ‘Status’ on the order line. This will show the order in detail:

Template/product ordered – by double clicking this you can see the template in full size.

Price – This will always be set to £0.00 as there is no cost to the Account Manager.

Units – This will show the amount of records within your mailing file.

Orders/Filters

View orders –You can filter by order status – e.g. orders in progress by selecting from the drop down.

All orders or order ID – You can view all orders or select a specific order by inputting the number. This will then return the specific order.

My Account – Account Information
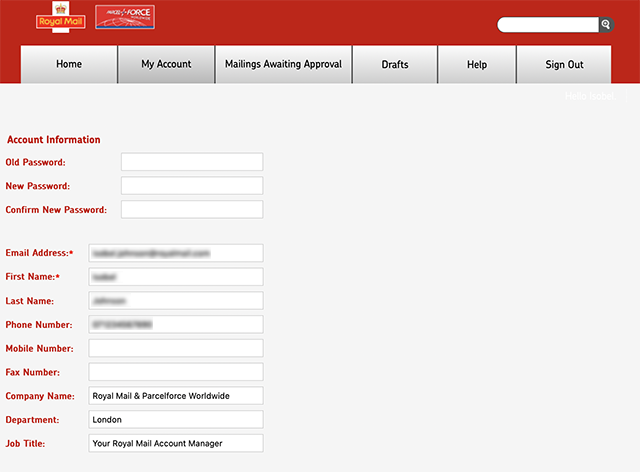
Change Password

• If you press on the ‘Account Information’ Section of the page, it will open the following page. The top section allows you to change your password, by inputting your ‘Old Password’ and then inputting a ‘New Password’ and then re-entering it within the ‘Confirm New Password’ (Please ensure that your password contains at least one digit, one capital letter and it is 8 characters/digits in length.

Change Account Information

• Please DO NOT change any other details within this page. There are existing processes in place with the ‘Team Leader’, so that any other changes to an Account Manager details e.g. telephone number, must be updated via the ‘Change Control’ documentation. o The reason being all updates reflected in both mail and email communications and this software will only deal with the former.

My Account – Invoice & Delivery Addresses

Invoice and Delivery Address

Both the Invoice/Delivery Address and Recipient lists are for administration purposes only. This allows the tracking of each order placed.

Mailing Awaiting Approval

The ‘Mailing Awaiting Approval’ displays all orders waiting your final approval including the mailing piece and amount of recipients. If you are happy to proceed to check out with ‘All’ of your orders ‘Check out’ button. However:

• If you wish to delete any of your orders you can do so by clicking on the ‘Dustbin’.

• If there are orders that you DO NOT wish to include as part of your existing orders, click on the ‘Trolley’ on the left of the order. This will remove the current item from your existing order, but keep it within the ‘Mailings Awaiting Approval’ part of the Toolkit to be referenced in the future.

• If you wish to continue to create another mailing piece, click on the ‘Continue Shopping’ to create it and it will be added to your order.

Drafts

Drafts

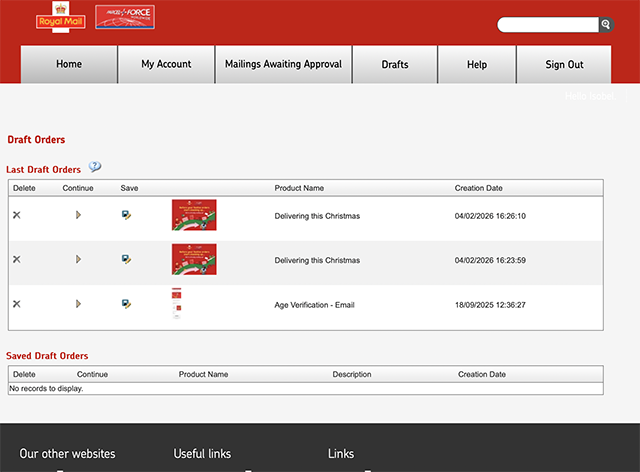
This is your work in progress area where you can store unfinished projects and return to it at anytime. This area automatically saves the latest version of a mailer. You are able to continue editing your mailing piece

Last Draft Orders

Please note that the software will only ever save up to three draft orders, these being the most recent. Therefore if you are creating artwork to be used in the future it is imperative that you save any drafts within the ‘Save Draft orders’ section otherwise you will loose your work.

Saved Draft Orders

You are given the option to save a template into the ‘Saved Draft’ area. A window will open and you can save a description against your template. You will then be able in the future to go and amend your template or take it to the check out.

Help

This area contains tutorials to help you use the software. The user will be able to watch this on screen by pressing on the play button. If you would rather download the tutorials you can do so from the ‘Help Guide’ on the left hand menu. There are three tutorials at the top of this help guide.


Need help?

email amfeedback@royalmail.com

Untitled Document